HEATING & AIR CONDITIONING AC002-98
July 24, 1998
R-12 AIR CONDITIONER SYSTEM RETROFIT
'86-'94 All models with R-12 Systems
The following information should be used for guidance when retrofitting vehicle air conditioning systems from R-12 to R134a refrigerant.
- Affected Vehicles
-
- 1986-1989 Van, 1986-1992 Cressida & Supra
- 1986-1993 Camry, Celica, Corolla, MR2, Tercel, 4-Runner, Land Cruiser
- 1986-1994 Truck
- 1991-1993 Previa
- 1992- 1993 Paseo
General Parts not included with Set are listed in table.
| PART NUMBER | QTY | PART NAME |
|---|---|---|
| 88840-33020 | 1 | R134a Retrofit Labels and Adaptors Set *1 |
| 90099-14044 | 2 | Receiver O-Rings |
| 90099-14045 | 1 | Suction Side O-Ring |
| 88374-33030 | 7/16-20 UNF high presure side Quick Disconnect Adaptor *2 | |
| 88374-33040 | 7/16-20 UNF low pressure side L-shaped Service Fitting Adaptor *2 | |
| 88374-33050 | 3/8-24 UNF high pressure side L-shaped Service Fitting Adaptor *2 | |
| 88374-33060 | 7/16-20 UNF high pressure side L-shaped Service Fitting Adaptor *2 | |
| 08885-09107 | *3 | ND-Oil 8 |
| 08885-09117 | *3 | ND-Oil 9 |
|
||
Model specific parts are listed in the application table.
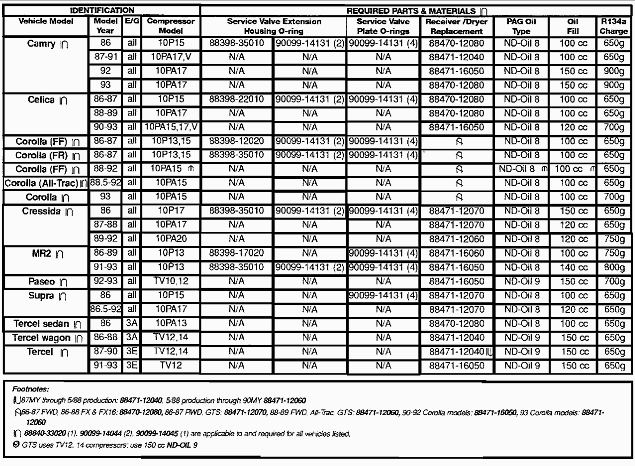
Passenger Vehicle Application Table
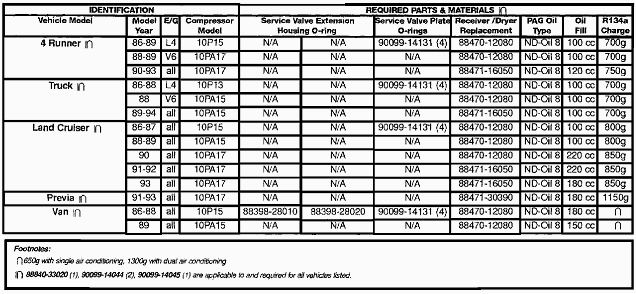
Required Tools & Materials
- Required Equipment:
- R-12 recovery/recycling/recharging equipment
- R134a recovery/recycling/recharging equipment
- Graduated measuring cylinder (for compressor oil)
- Valve core remover for service valves
- Air conditioner manifold gauge set
- Torque Wrench Kit, 00002-50284-01, contains the following
14 mm 00002-51410-01
17 mm 00002-51710-01
22 mm 00002-52216-01
27 mm 00002-52724-01 - Required Parts & Materials:
- R134a Refrigerant
- Service Fitting Adaptors
- Caution Labels
- Compressor oil
- Receiver/Dryer for R134a
- 0-Rings for hose connections
- 0-Rings for Compressor Extension Housing/Service Plate *3
- Loctite 262 or equivalent
Retrofitting Overview
- Refrigerant and Oil Charges. Oil and refrigerant charge amounts are different after the R-12 system has been retrofitted to R134a. Refrigerant charge amounts are less, while oil charge amounts are greater, compared to R-12 system requirements.*
- System Performance. A slight decrease in system performance may be noticed on some vehicles under certain operating conditions.
- Refrigerant Pressures. R134a high side pressures are greater than that of R-12 above ambient temperatures of 68°F
- Flushing Requirements. There is no need to remove or flush R-12 mineral oil from the system. Simply charge the system with the specified type and amount* of PAG oil to provide proper lubrication.
- Use of Sight Glass
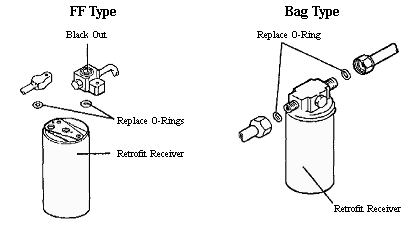
Mineral based R-12 oil remains and circulates in the A/C system and does not dissolve in R134a refrigerant. This results in a cloudy appearance at the sight glass making it impossible to judge the refrigerant charge amount by using the sight glass method. To prevent misdiagnosis on retrofit vehicles, apply black paint to the sight glass on block- joint (FF) type receiver/dryers. Union-nut joint (BAG) type retrofit receiver/dryers are manufactured without a sight glass.
*NOTE:Refer to the OIL TYPE and CHARGE columns in Application Tables for proper amounts of ND-Oil 8 or ND-Oil 9.
Service Precautions
- Refrigerant handling
- Do not handle refrigerant in an enclosed area or near an open flame.
- Always wear eye protection.
- Avoid getting liquid refrigerant in your eyes or on your skin.
- Never heat a container with an open flame.
- Keep containers below 104°F
- When heating a refrigerant can with water, keep the valve above water.
- Never reuse empty service cans.
- Replacing Parts
- Plug off any open connections to prevent the entry of moisture and dust.
- Do not remove plugs from receiver/dryer ports until it is ready for installation.
- Tightening connecting parts
- Apply a few drops of specified PAG compressor oil to 0-ring fittings before tightening.
- Avoid twisting refrigerant piping when installing R134a service fitting adapters.
- Tighten all fittings to specified torque.
Repair Procedure
- Vehicle Inspection: Ensure the integrity of the A/C system before proceeding with retrofit.
- Recover R-12 using R-12 recovery/recycling/recharging equipment.
- Install R134a service fitting adapters:
- Remove valve cores from R-12 service fittings and discard.
- Clean external threads of the R-12 service fittings.
- Apply adhesive to threads (Loctite 262 or equivalent), screw on R134a adapter fittings, and tighten to 13 ft.-lb.
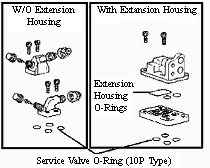
NOTE: Vehicles with more than 2 service fittings will require the installation of additional adaptors. All service fittings must have R134a adaptors installed. - Replace compressor 0-rings (10P only):
- Remove compressor from vehicle.
- Install covers on hose connection ports to prevent airborne contamination.
- Clean compressor body and service valve area using a brush and compressed air.
- Remove service valve plate.
- Remove 0-rings from service valve plate and discard.
- Remove extension housing if used otherwise go to step 7.
- Separate extension housing from service valve plate.
- Remove and discard 0-rings.
- Lubricate and install retrofit 0-rings into extension housing using specified PAG oil (see tables).
- Reassemble extension housing to service valve plate.
- Reinstall service valve plate to compressor. Torque bolts to 19 ft.lbs.
- Reinstall compressor assembly.
- Replace piping and hose 0-rings:
- Disconnect suction and discharge hoses from compressor.
- Remove and discard old 0-rings.
- Lubricate and install retrofit 0-rings with specified PAG oil (see tables).
- Disconnect discharge hose from condenser.
- Remove and discard old O-rings.
- Lubricate and install retrofit O-rings with specified PAG oil (see tables).
- Reconnect hoses and torque to specification. (Specifications can be found in applicable manuals/guides.)
- Replace receiver/dryer
- Remove and discard original R-12 Receiver/Dryer
- Using the tables, determine the proper type and amount of PAG oil. Pour 1/2 of the specified oil into the "OUT" side of the Receiver/Dryer.
- Black out the sight glass on block - joint - type receiver/dryer with black paint.
- Lubricate and install retrofit 0-rings with specified PAG oil (see tables).
- lnstall retrofit Receiver/Dryer.
- Evacuate, charge, and leak test the system (Use manufacturer's recommended procedure).
- Evacuate for 45 minutes.
- Vacuum check.
-
Add compressor oil.
Note:* Using recovery/recycling/recharging equipment charge the system with the remaining 1/2 of the specified amount of oil from step F2. - Charge system with specified amount of R134a. (refer to tables).
- Perform a gas leak check.
- Confirm cooling performance of Air Conditioning system.
- Install retrofit labels:
- Choose R134a "USE ONLY" label for proper oil type (ND-Oil 8 or ND-Oil 9).
- Using a ball point pen, enter the proper retrofit refrigerant and oil charges on the caution label.
- Cross out unused type of compressor oil on caution label.
- Affix labels in a prominent location such as radiator support, underside of hood, or suspension tower area.
- Remove any R-12 labels.